


HTML select element allows us to select an option from a set. We will see in the next lesson that depending on how we configure it, we can select several options.
With an example, let's make a form that requests to load the name of a person and the country where they live.
The page1.html file is:
<!DOCTYPE html>
<html>

<head>
    <title>Form select - coding180 Robort </title>
    <meta charset="UTF-8">
</head>

<body>
    <form action="registraratos.php" method="post">
        Enter your name:
        <input type="text" name="name" size="30"><br>
        Select your country:
        <select name="country">
            <option value="1">Argentina</option>
            <option value="2">Spain</option>
            <option value="3">Mexico</option>
            <option value="4">Guatemala</option>
            <option value="5">Honduras</option>
            <option value="7">El Salvador</option>
            <option value="8">Venezuela</option>
            <option value="9">Colombia</option>
            <option value="10">Cuba</option>
            <option value="11">Bolivia</option>
            <option value="13">Peru</option>
            <option value="14">Ecuador</option>
            <option value="15">Paraguay</option>
            <option value="16">Uruguay</option>
            <option value="17">Chile</option>
        </select>
        <br>
        <input type="submit" value="Submit">
    </form>
</body>

</html>
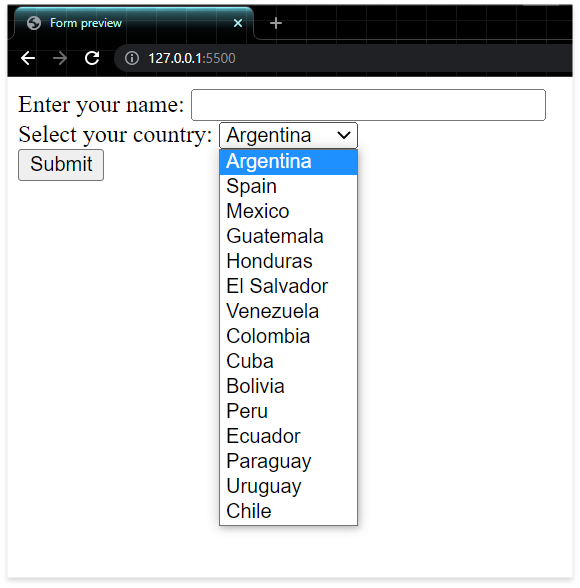
The result in the browser is:
Let's see the syntax to create a select box, first we open the select tag which has the name property defined:
<select name="country">
Then, without closing the select tag, we define many elements of type option as the options the selection box will have:
<option value="1">Argentina</option>
<option value="2">Spain</option>
<option value="3">Mexico</option>
The option element defines the text to be displayed and in the value attribute it indicates the value to be sent to the server if that option is selected.
After defining all the options of our selection box we close the select tag:
</select>
A graphic variant of this control is to initialize the size attribute of the select element with a value other than one, with this we create a selection box that simultaneously shows several elements (only one can be chosen anyway).
That is to say that with the size property we only achieve an aesthetic change of the control.
For example if we define the value 5:
<select name="country" size="5">
We have as a result: